HowTo: Deploy automated AI/ML pipeline using TWCC CLI
This article will help users understand how to use the TWCC CLI and a Virtual Compute Service (VCS) to concatenate the following tasks into an automated process (pipeline), improve work efficiency, and save the cost of continuous running containers.
1. Create a container
2. Execute the training script
3. Delete the container
By deploying a pipeline to connect TWCC resources, you can hand over manual tasks to script to automate until completion. The arrangement of time and manpower will be more flexible, and the resources will be automatically deleted after the computing completes, so the computing cost will be reduced accordingly.
Deploy the environmen
The example in this article uses the TWCC Virtual Compute Service with TWCC CLI pre-installed as the local host. You can quickly deploy an automated management process for containers. Alternatively, you can install TWCC CLI on your own computer and operate it.
For TWCC-CLI installation steps and resource operation instructions, please refer to TWCC-CLI.
Step 1. Create a VCS instance
Following Create VCS instance, create a virtual computing instance on the portal with the following settings:
Image               : Ubuntu 20.04
Basic configuration : v.super
Step 2. Enable TWCC CLI
Please login to TWCC CLI to enable TWCC CLI.
Step 3. Install jq
jq is a tool for parsing JSON. TWCC CLI data can be converted to JSON format, in which some data can be intercepted with jq for application. The related documentation can be found in the jq manual.
- Enter the following command to install jq:
sudo apt install jq
SSH Without Password
Generally, SSH connection needs to insert the key or enter the password to log in, so the automated process will be stopped and unable to continue.
Use the following method to create a container and send the SSH key of the VCS instance to the container. After that, you can directly login to the container without inserting the key or entering the password.
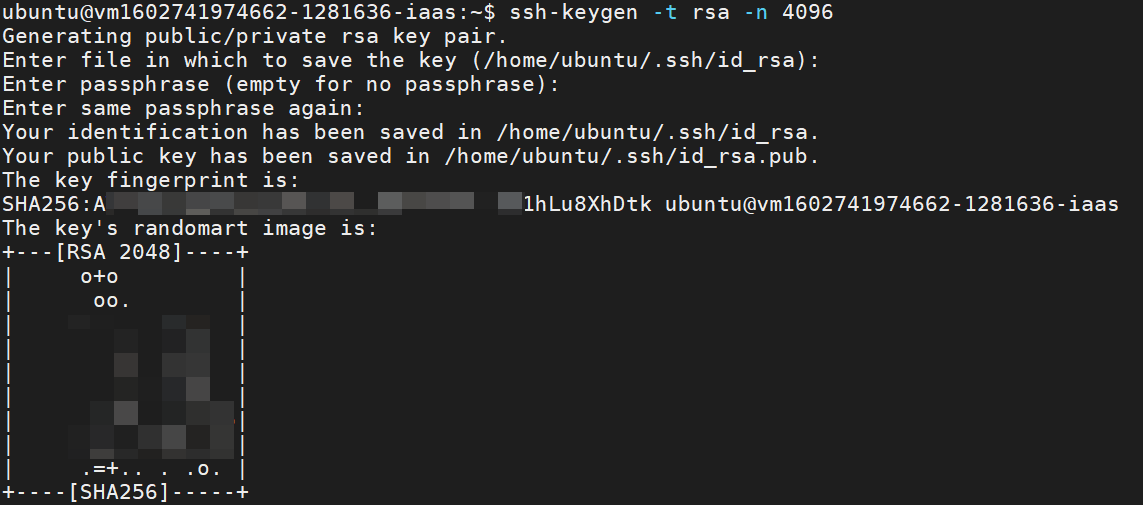
Step 1. Create a SSH key
- Enter the following command to create a SSH key
ssh-keygen -t rsa -n 4096
Press Enter key to skip the following three questions.
Enter file in which to save the key (/home/ubuntu/.ssh/id_rsa):
Enter passphrase (empty for no passphrase):
Enter same passphrase again:
- Enter the following command to create an Interactive Container.
twccli mk ccs -gpu 1
Step 2. Copy SSH key to the Interactive Container
- Enter the following command to copy SSH key to the Interactive Container.
ssh-copy-id <USERNAME>@<CCS_IP> -p <PORT>

# <USERNAME>    supercomputer account
# <CCS_IP>      container public IP
# <PORT>        container SSH port
- The first time you put the key into the container, you will need to enter the supercomputer password. After that, you will no longer need to enter the password when executing commands to the container inside the VCS instance.

Step 3. Download the sample program: GPU Burn
In this article, we take GPU burn testing as an example. You can refer to the following steps to load the required model training program after entering the container environment, or directly Use SFTP + Filezilla to upload the program to the container default storage space, namely Hyper File System.
- Enter the following command to enter the container environment.
ssh <USERNAME>@<CCS_IP> -p <PORT>

# <USERNAME>    supercomputer account
# <CCS_IP>      container public IP
# <PORT>        container SSH port
- Download the sample program: GPU Burn
git clone https://github.com/wilicc/gpu-burn.git
- Compile the program into usable command. (optional)
cd gpu-burn
make >> progress.log 2>&1
- Exit the container and return to the VCS instance environment.
exit
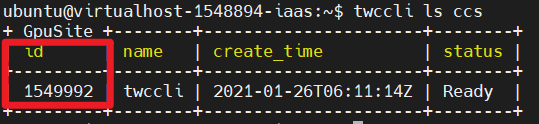
- After completing the above actions, you can delete the containers used to deploy the environment. Please list all the containers and find the container ID first.
twccli ls ccs
- Delete the container for deploying the environment.
twccli rm ccs -f -s <SITE_ID>

# <SITE_ID>     Container ID
We finish deploying the environment and loading the execution program! Next, you can start to make and execute scripts to automatically create containers, perform computing, and delete containers.
AI/ML pipeline script
The automated AI/ML pipeline script can be divided into 5 steps:
- Create: Create container computing resources.
- Put Data: Upload related files to the container.
- Execution: Execute the program.
- Collect Data: Collect the results of progam execution.
- Garbage Collection: Recycle used computing resources.
Please refer to the steps below to create and execute a pipeline script.
Step 1. Create pipeline script
- Enter the following command to edit pipeline script.
vi AI_ML.sh
- Enter
ito enter the editing mode, and paste the following example script intoAI_ML.sh. The content can be modified according to your computing program, and you can also choose to create a larger container.
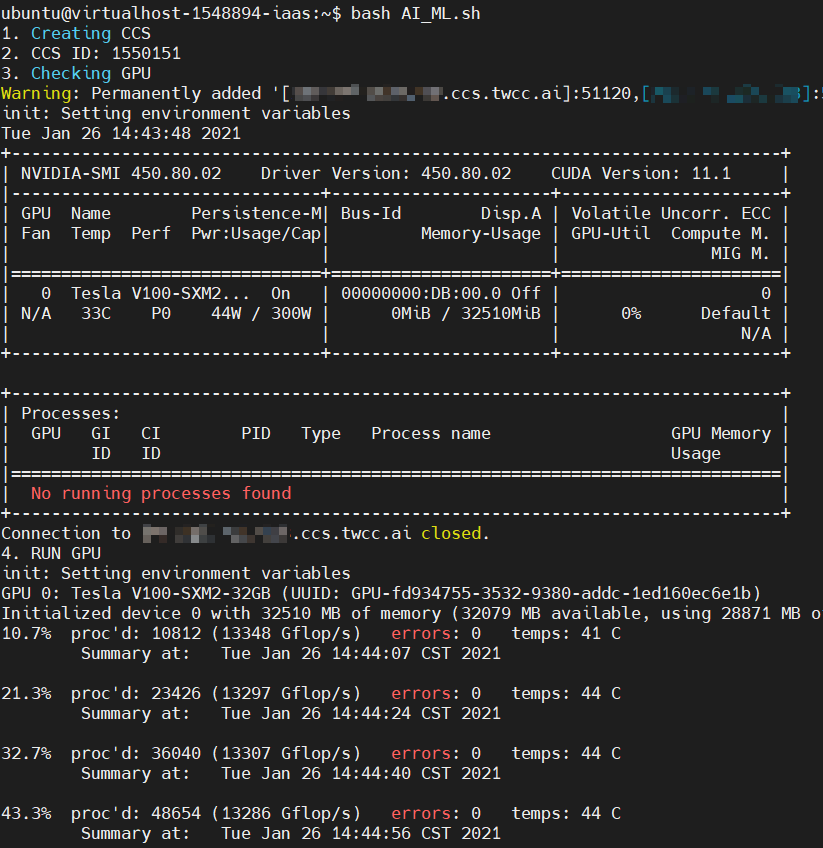
TWCC_CLI_CMD=/usr/local/bin/twccli
echo "1. Creating CCS" # Create Interactive Container
$TWCC_CLI_CMD mk ccs -gpu 1 -wait -json > ccs_res.log
CCS_ID=$(cat ccs_res.log | jq '.id')
echo "2. CCS ID:" $CCS_ID # Interactive Container's ID
echo "3. Checking GPU" # Viewing GPU status
ssh -t -o "StrictHostKeyChecking=no" `$TWCC_CLI_CMD ls ccs -gssh -s $CCS_ID` "/bin/bash --login -c nvidia-smi"
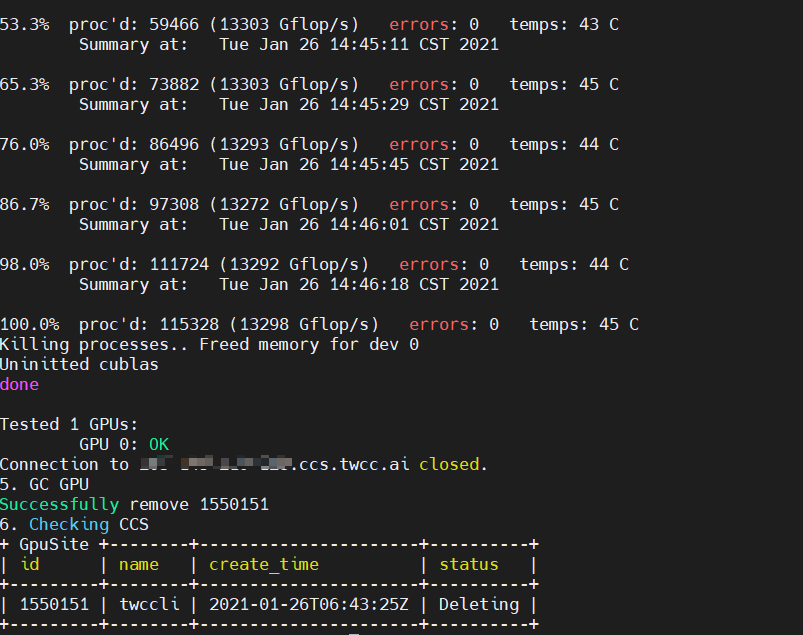
echo "4. RUN GPU" # Executing computing program
ssh -t -o "StrictHostKeyChecking=no" `$TWCC_CLI_CMD ls ccs -gssh -s $CCS_ID` "cd gpu-burn;/bin/bash --login -c './gpu_burn 150'"
# You may modified "cd gpu-burn;/bin/bash --login -c './gpu_burn 150'" according to your program.
echo "5. GC GPU" # Delete Interactive Container
$TWCC_CLI_CMD rm ccs -f -s $CCS_ID
echo "6. Checking CCS" # View container status
$TWCC_CLI_CMD ls ccs
- Press Esc key and enter
:wq!to save.
- Step echo "4. RUN GPU" depends on your program. You may modify this part of the script.
"cd gpu-burn;/bin/bash --login -c './gpu_burn 150'"
Step 2. Execute the pipeline script
- Enter the following command to execute the pipeline script.
bash AI_ML.sh
- Script execution screen is as follows. The container will be created automatically, the GPU burn program will be executed, and the container will be deleted automatically.