VCS instance images
VCS instance images can preserve the state of an instance and the system disk with your operating system. We recommend creating an image for your instance before performing a significant system upgrade or installing special software so that you can roll back to a certain time when needed.
- After deleting a VCS instance, the data in the system disk will disappear. To back up the system disk, please refer to create an image to create an image for the instance before deleting it.
- The size of the image is the same as the size of the system disk you selected to create your virtual instance. After the image been created, it will be billed at the virtual disk (HDD) rate.
- For the difference between Tenant Admin and Tenant User for using VCS instance, please refer to User roles and permissions.
Manage images
On the VCS Instance Image Management page, you can manage the images created by your project and those shared from other projects.
View image information
View the image information, such as ID, name, description, state, creation time, creator, etc.
The project number (e.g. GOVxxxxxx-) in front of the name indicates that the image is shared from that project.
- TWSC Portal
- TWCC CLI
- Go to the VCS Instance Image Management page, you will see all the image information in the list, the latest created image will be listed on the top. After creation, wait for the state to change from
QUEUEDtoACTIVE, then you are able to use the image to create instances.

Command
twccli ls vcs -snap [-all]      # View all images([-all]Tenant Admins only)
                    [-s]        # View the image with a specific ID
- The parameters in the square brackets [ ] are optional and the rest are required.
Example
- View the image state created from the VCS image with ID
2580765
twccli ls vcs -snap -s 2580765

Image auto backup
If you want to automatically backup your image, please go to the VCS Instance Details page to set up the backup schedule. You can manage your auto-backup image on the Image Management page.
The naming method for auto-backup image is Auto-Backup-Project ID-VCS instance name-Timestamp. You can mange the auto-backup images on the Image Management page.
- Enabling the auto-backup feature on multiple VCS instances may generate a large number of images and take up substantial storage space, leading to considerable costs. Please be mindful and manage your images closely.
- When the auto-backup feature is enabled, the system will only retain the three most recent copies of the image for each instance. If a new image is created while the three quotas are filled, the system will automatically delete the oldest one.
Share images and sharing management
TWSC provides cross-project sharing of VCS images. By sharing an image to a target project, a copy of an instance that has been customized and deployed can be shared. Thus, the same environment can be built across projects.
Also, you can copy instances from an old project to a new project using this feature.
- Only Tenant Admins, who are also the admins of the source and target projects, are allowed to share images to other target projects.
- Sharing of VCS instance images is supported, but sharing of Data Disk Snapshot is not.
- Sharing of licensed image files (e.g. Windows Server with license) across projects is not supported.
- The images shared by the source project can be used by all members of the target project to create instances.
The shared images can only be used to create CPU instances, creating GPU instances is not yet supported.
- The images being shared and the shared images are independent of each other, with their storage usage calculated separately.
- TWSC Portal
- TWCC CLI (TBD)
Share images
- On the Image Management page, select an image file, click the menu button on the right, and then select SHARE.

- Select the project to share to (the target project to recieve the share) and the image name, click OK to jump to Image Sharing Management page for the sharing process.
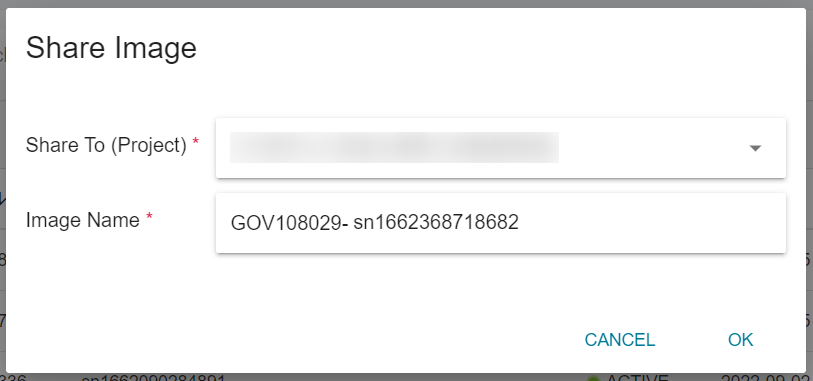
By default, the image name has your project (source project) number in front of it, followed by the original image file name (editable), so that the members in the target project can easily recognize the source of the shared image.
Sharing Management
Go to the Image Sharing Management page to view the name, target project, state and creation time of the shared images.
Once shared, the image state changes to approved (still in the process of sharing), and shows finished (sharing complete) after the sharing is over. Members in the target project can use the shared image to Create a custom instance.

Only Tenant Admins can view their own (not project-wide) image file sharing information.
Quick Animation Tutorial

Move images to cold / hot storage
- Enter the Image Management page, select the image you want to move, and click on the right, or go to the Image Details page, and click MOVE TO STATIC STORAGE or MOVE TO WORKSPACE.


An image can be moved to static storage when it is in ACTIVE state, and it can be moved to workspace when it is in ARCHIVED state.
- After moving the image to static storage, the state will change to
ARCHIVING. Once the migration is completed, the state will transition toARCHIVED. If the image is moved from static storage to workspace, the state will change toUNARCHIVING, and after the migration is finished, the state will becomeACTIVE.

Please refer to the Price List for the costs of image static storage.
If the image has been used to create a VCS instance, once the image is moved to static storage, the instance built on this image can no longer use the Auto Scaling feature and cannot be resized.
Delete images
To ensure the instance can be created from the image completely, please do not delete the image if the instance is in the Starting state.
- TWSC Portal
- TWCC CLI (Not yet supported)
- To delete images that are no longer needed, click the menu button on the right of the image list, and then click DELETE.

Create instances from images
Please refer to Create a custom instance to create a customized instance from the image created in the project or from an image shared by other projects.